PowerPoint presentations are a go-to for everything from school projects to corporate pitches, but let’s be real—sometimes a plain ol’ slide just won’t cut it. Enter YouTube videos: the dynamic game-changer that can elevate your content and keep your audience hooked. Whether you’re explaining a concept, showcasing a product, or just trying to add a splash of flair, embedding videos can make your presentation pop. But how do you seamlessly toss those video gems into your slides without a hitch? We’re about to break it down for you, so you can go from “meh” to “wow” with just a few clicks!
Mastering the Basics of YouTube Video Embedding in PowerPoint
Imagine you’re gearing up for a presentation, and suddenly, you realize a YouTube video could perfectly illustrate your points—like the cherry on top of your sundae! Fortunately, embedding a YouTube video in PowerPoint isn’t as complicated as it might sound. All you need to do is grab the video’s link, open up your PowerPoint slide, and navigate to the Insert tab. From there, select Video and then Online Video. Paste that link in, hit Enter, and voilà! Your video is now seamlessly integrated, just waiting for you to hit play and wow your audience.
But wait, there’s more! If you want to go the extra mile and ensure everything looks crisp and professional, consider some handy tips. Make sure to check your internet connection before presenting—nothing kills the vibe faster than a buffering video. Plus, you can customize the video size by clicking on the edges and dragging, ensuring it fits just right on your slide. It’s like tailoring a suit! Keep in mind the following:
- Test the Video: Always preview your slideshow to iron out any kinks.
- Use High-Quality Videos: Opt for HD content to keep things looking sharp.
- Engage the Audience: Ask questions related to the video to boost interest.
Elevate Your Presentation with Engaging Video Content

By integrating video content into your presentation, you’re not just sharing information; you’re telling a story that captivates your audience. Imagine this: instead of reading off slides filled with text, you whisk your viewers into an environment that evokes emotions, inspires action, or simply entertains. YouTube videos offer a treasure trove of resources that can enhance your message and make your presentation memorable. Whether it’s a testimonial that adds credibility or a tutorial that simplifies complex concepts, find those clips that resonate with your theme and engage on a deeper level.
Embedding videos in PowerPoint is as easy as pie! Here’s a quick checklist to ensure your video is seamlessly added:
- Start by selecting the desired video – Look for clips that complement your key points.
- Copy the URL – Make sure it’s from a public video that won’t leave your audience in the dark.
- Insert in PowerPoint – Use the “Insert” tab and select “Video from Online Sources.” Paste that link, and voilà!
- Test it – Preview your presentation to ensure everything plays smoothly.
With each video you embed, you’re stacking the odds in your favor for a presentation that not only informs but also entertains. So why not take that plunge? After all, a well-placed video could be the difference between a snooze-fest and a standing ovation!
Troubleshooting Common Embedding Issues with Ease
Embedding YouTube videos into PowerPoint can feel like trying to fit a square peg into a round hole, especially when things don’t go according to plan. One common hiccup you might encounter is the dreaded “video not playing” issue. This can happen for a couple of reasons. First, make sure you have a stable internet connection. PowerPoint needs to access YouTube’s server to fetch the video, and without that connection, it’s like trying to watch a movie without a projector. Additionally, check if you’re using a supported version of PowerPoint. If your software is outdated, it might not handle the embedding feature properly. Updating to the latest version can often resolve these pesky glitches.
Another frequent problem is related to permissions—imagine wanting to share a friend’s secret recipe but not having their go-ahead. If the video you’re trying to embed is marked as “private” or “unlisted” on YouTube, you won’t be able to access it in your presentation. To tackle this, either look for a similar public video or reach out to the video owner for permission. If you’re embedding multiple videos, sometimes PowerPoint can feel overwhelmed. Keep things tidy by limiting your selection. This way, you’ll ensure smoother navigation and a cleaner presentation. Here’s a quick checklist to help you through the troubleshooting maze:
- Check your internet connection
- Ensure PowerPoint is updated
- Verify video privacy settings
- Limit the number of embedded videos
Enhancing Your Slides: Tips for Smooth Video Playback

When it comes to integrating YouTube videos into your slides, you want everything to flow as smoothly as melted butter on warm toast. Here are a few tips to make sure your video playback goes off without a hitch:
- Optimize Video Quality: Always select the resolution that downloads smoothly on your bandwidth. A high-resolution video can lead to lag, so keep it in the sweet spot where quality meets performance.
- Check Internet Connectivity: Ensure you’re on a stable network. Nothing kills the vibe like a buffering video right in the middle of your presentation.
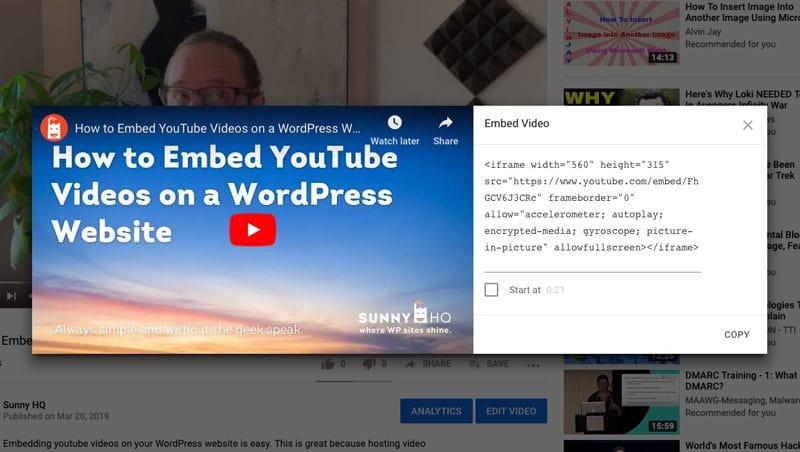
- Embed Carefully: Use the iframe code provided by YouTube to embed rather than just linking. This gives your slides more stability and control over the playback.
Understanding the nuances of video embedding can turn an ordinary presentation into an engaging experience. Remember, the magic often lies in the settings:
| Setting | Effect on Playback |
|---|---|
| Autoplay | Starts immediately, but may not work in all browsers. |
| Loop | Great for short clips that need repetition. |
| Mute on Start | Ideal for videos with background music that could distract. |
Final Thoughts
So there you have it! Embedding YouTube videos into your PowerPoint presentations can transform a basic slideshow into an engaging masterpiece. It’s like spicing up a plain pasta dish with a delicious homemade sauce—it elevates the whole experience. Whether you’re sprucing up a classroom lecture or jazzing up a business pitch, these steps will help you integrate visuals that keep your audience glued to their seats (or at least not scrolling their phones!).
Remember, it’s all about creating that dynamic flow between visuals and your message. So don’t hesitate—grab your favorite YouTube clips, add them to your slides, and watch how they breathe life into your presentations. Got thoughts or questions? Feel free to drop a comment below. Happy presenting! 🎥✨