Ever find yourself lost in the endless sea of YouTube videos, wishing you could create your own perfect viewing experience? Well, you’re not alone! In a world overflowing with content, having the right tools at your fingertips can make all the difference. Enter the YouTube miniplayer—your trusty sidekick for binge-watching your favorite creators while multitasking like a pro. Imagine being able to seamlessly watch the latest vlogs or tutorials while scrolling through social media or working on that project you’ve been procrastinating on. Sounds amazing, right? In this guide, we’ll dive into the simple steps to craft a YouTube miniplayer that fits your style, enhances your viewing pleasure, and allows you to juggle your interests effortlessly. So, grab your snacks, settle in, and let’s get started on leveling up your YouTube game!
Choosing the Right Size: Finding Balance in Your Mini Player Design
When designing your mini player, size really matters. Think of it like tailoring a suit – it needs to fit just right. Too big and it clutters your interface, but too small and users might miss important information. Striking that balance is key. Start by considering your audience: Are they viewing on a laptop, tablet, or smartphone? Each device has different dimensions, and your mini player should adapt accordingly. Focus on ensuring essential elements like play buttons, volume controls, and video titles are easy to access without squinting or struggling to tap the right spot.
To help visualize the ideal sizes, consider these factors:
- Screen Dimensions: Cater to various devices by testing your design on different screen sizes.
- Functionality: Make sure that every button is within a thumb’s reach, especially for mobile users.
- Visual Appeal: Your mini player’s size should complement the overall layout – not overwhelm it.
| Device Type | Optimal Width | Optimal Height |
|---|---|---|
| Laptop | 320-400px | 150-200px |
| Tablet | 280-360px | 120-180px |
| Smartphone | 240-300px | 100-150px |
So, test, iterate, and fine-tune until it feels just right. Remember, creating a mini player is all about user experience; when they can engage with your content easily, they’re more likely to stick around and enjoy the show!
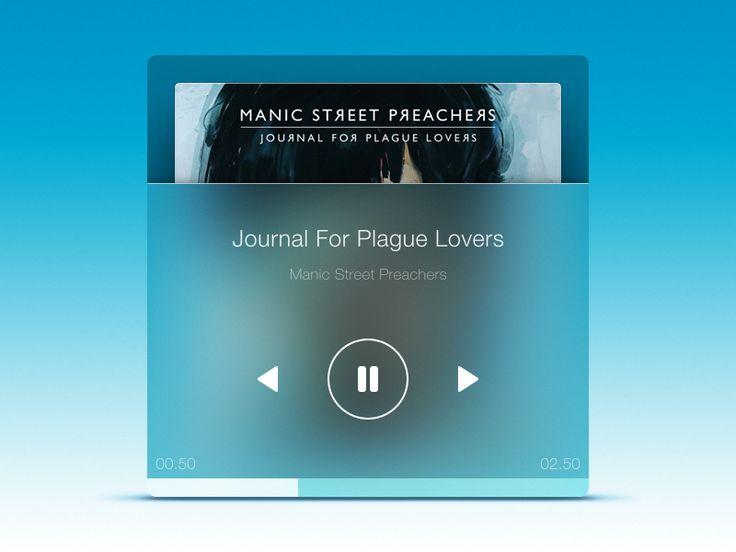
Color and Style: Personalizing Your Mini Player for Maximum Impact
When it comes to personalizing your mini player, color and style choices are your playground. Imagine your mini player as a blank canvas, just waiting for your unique flair. Start with a color palette that resonates with your vibe—choose from bold reds, serene blues, or even playful pastels. Don’t be afraid to mix and match! For example, pairing a rich navy with a soft peach can create a chic contrast that draws the eye. Also, consider incorporating gradients or subtle textures to elevate your player visually. Why settle for ordinary when you can animate your mini player into a striking piece of art?
Beyond colors, style elements make your mini player truly stand out. Think about the layout and font choices that reflect your personal brand. Do you prefer a sleek, modern look, or are you leaning towards something nostalgic and retro? Utilize rounded edges for a softer feel, or opt for sharp lines for a more dynamic appearance. Here’s a handy table to quickly visualize your choices:
| Style Element | Description |
|---|---|
| Color Theme | Sets the mood of your player. |
| Font Style | Affects readability and character. |
| Layout Design | Impacts user interaction and visual flow. |
| Iconography | Enhances navigation and user experience. |
With these elements combined, your mini player will not just serve a functional purpose but will also convey your unique essence. So, why wait? Embrace the creative process and let your mini player reflect the authentic you!
Functional Features: Enhancing User Experience Without Overcomplicating
When it comes to enhancing user experience in your YouTube miniplayer, simplicity is key. Instead of bombarding users with a plethora of features that can overwhelm and confuse, focus on integrating thoughtful functionalities that genuinely elevate the viewing experience. Here are some essential features to consider that balance functionality with ease of use:
- Seamless Navigation: Ensure viewers can easily skip, rewind, or pause without missing a beat.
- Customizable Settings: Let users modify playback speed or toggle subtitles, catering to their unique preferences.
- Responsive Design: Your miniplayer should adapt beautifully across devices, whether it’s a smartphone or desktop.
It’s crucial to optimize your miniplayer without adding unnecessary complexity. Think of it like decluttering a room—every piece should serve a purpose. To help visualize the must-have features, here’s a simple comparison table highlighting their benefits:
| Feature | Benefit |
|---|---|
| Seamless Navigation | Easy to control playback, enhancing engagement. |
| Customizable Settings | Personalization boosts user satisfaction. |
| Responsive Design | Consistent experience across all devices. |
Testing and Optimization: Ensuring Your Mini Player Runs Smoothly

To ensure your mini player operates seamlessly, it’s crucial to dive into testing and optimization. Start by running the player across different devices and browsers. Each platform behaves uniquely, and what works effortlessly on one might stumble on another. Therefore, cross-browser testing is essential. Make sure to monitor factors like performance speed, buffering times, and user interface responsiveness. You wouldn’t want a viewer to click play and sit in silence, right? Keep an eye out for bug reports, user feedback, and general performance metrics that can shed light on any hiccups.
Optimization doesn’t just end after launch; it’s an ongoing process. Use A/B testing to understand which features resonate best with your audience. Consider examining things like button placements, color contrasts, and even content recommendations. You can lay it all out in a simple table for clarity:
| Feature | Option A | Option B |
|---|---|---|
| Play Button Color | Bright Red | Muted Blue |
| Comment Section Placement | Below Video | Right Side |
| Thumbnail Size | Large | Standard |
After analyzing the results, you’ll be in a better position to tweak your mini player into something that resonates with users. Keep testing, keep optimizing, and watch as your player transforms into a viewer’s favorite hub for content! 🎥✨
In Conclusion
And there you have it! Crafting your perfect YouTube miniplayer doesn’t have to feel like assembling a tricky puzzle. With these simple tips, you’ve got everything you need to create a viewing experience that’s just right for you. Whether you’re tweaking the settings to suit your vibe or adding custom playlists, the power is in your hands to shape your own binge-watching haven. So go ahead, revel in those late-night deep dives or spontaneous music jam sessions. Embrace your creativity, and let your YouTube miniplayer reflect the unique taste that is so distinctly you. Remember, the best experience is the one that feels the most comfortable and enjoyable. Now, hit that play button and enjoy! Happy watching!

