Are you tired of watching your brilliantly crafted PowerPoint presentations lose their sparkle when they hit YouTube? It’s frustrating, right? You pour your heart into designing slides that pop, only to find that uploading them leads to blurry visuals that detract from your message. But here’s the good news: saving your PowerPoint slides at 300 DPI can be a game changer! Not only does it ensure crystal-clear images, but it also gives your presentations that professional sheen. Let’s dive into some easy steps to make sure your slides shine on YouTube, turning your hard work into visuals that really stand out. Ready to elevate your game? Let’s get started!
Mastering the Art of DPI: Why 300 is Your Sweet Spot for YouTube Presentation
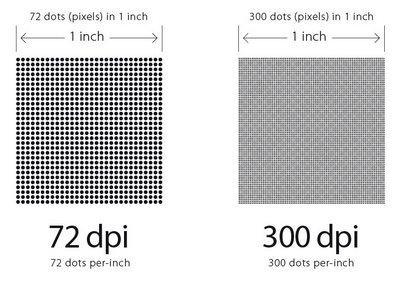
When it comes to presentations on YouTube, understanding DPI (dots per inch) can make a world of difference in how your content is perceived. Think of DPI as the secret sauce that enhances the clarity and detail of your slides. Aiming for 300 DPI strikes the perfect balance between quality and file size, ensuring that your visuals pop without weighing down your presentation. This higher resolution grabs your audience’s attention and prevents blurry images, much like how a crisp, clear photograph commands a room. Ideally, you want each slide to be a visual treat, keeping every element sharp and vibrant regardless of screen size.
Saving your slides at this optimum DPI isn’t a Herculean task; it simply involves a few clicks. Start by selecting the right save options within PowerPoint. Opt for PNG or JPEG formats, as they preserve the quality with fewer artifacts. Don’t overlook the export feature — it’s like a turbo boost for your slides, allowing you to set the resolution precisely where you want it. Here’s a quick overview of the steps:
- Open your presentation and click on File.
- Choose Save As and select your desired location.
- From Save as type, pick either PNG or JPEG.
- Hit Options and set the DPI to 300.
- Hit Save and watch your visuals transform!
Choosing the Right File Format: Ensuring Quality Without Compromising Size
When it comes to saving PowerPoint slides that look fantastic on YouTube, the file format you choose plays a pivotal role. A PNG or JPEG format is often your best bet for striking visuals, particularly when you’re aiming for that crisp 300 DPI resolution. These formats preserve image quality beautifully, but it’s essential to balance that with size. Who wants a file so big that it takes forever to upload? Imagine trying to squeeze a giant balloon into a tiny car – it just won’t fit! By opting for compressed settings, you can reduce the file size without sacrificing too much clarity. Consider choosing JPEG for photographs and PNG for images with large areas of flat color or text. Here’s a quick breakdown:
| Format | Best For | Size vs. Quality |
|---|---|---|
| JPEG | Photographs | Good balance, smaller size |
| PNG | Graphics and Text | Higher quality, larger size |
Once you decide on the format, keep in mind that exporting settings play a critical part too. Use the highest quality setting available in your presentation software to ensure those slides shine like diamonds on the screen. And don’t forget about the dimensions; YouTube loves a 16:9 aspect ratio. It’s like wearing the perfect outfit for a fancy party – it just fits! By choosing the right format and settings, you can have gorgeous slides that also upload quickly. It’s a win-win, right?
Optimizing Your Slides: Tips for Enhancing Visual Appeal Before Exporting

When it comes to boosting the visual appeal of your slides, a little finesse goes a long way. Start by ensuring your color palette is cohesive and visually striking. Aim for contrasting colors that pop against one another, making your text easy to read. Use high-quality images that resonate with your message, because nothing says “I care” like a crisp, clear photo. Remember, whitespace is your friend! It helps your slides breathe, allowing your audience to focus on what truly matters without feeling overwhelmed.
Don’t forget about font choices—opt for san-serif fonts for clarity and modern aesthetics. Keep it simple, using bold or italics sparingly to highlight key points. If you’re incorporating graphs or illustrations, ensure they’re not just decorative, but enhance your narrative. Lastly, applying subtle animations can captivate your audience, drawing them into the story you’re weaving, but don’t go overboard! A good rule of thumb? If it distracts from your message, it’s best left out.
Seamless Exporting: Steps to Save Your Presentation with Flawless Efficiency
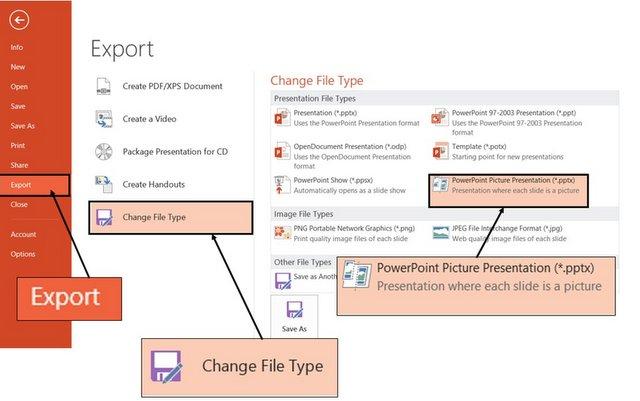
When you’re creating a stunning PowerPoint presentation destined for YouTube, saving those slides at a crisp 300 DPI makes all the difference. First things first, start by completing your slides to perfection. Once you’re satisfied with everything, navigate to the File menu. Then, select Export, and choose the option Create a Video. But hold on! Before you hit “Create,” double-check that you’re setting the resolution to 1920×1080 pixels or higher. This will ensure your visuals maintain sharpness, especially when viewed on larger screens. Don’t forget—select Use Recorded Timings and Narrations if you want to sync your audio with the slides.
Next, after exporting your presentation, you’ll want to convert your final video into images at 300 DPI. Use an image editing software like Photoshop or an online converter. Import your video, and extract stills or frames as images, ensuring you select the 300 DPI option. That’s right! You’re taking full advantage of that high resolution, which translates into crisp visuals for your audience. For added organization, here’s a quick snapshot of the software options to consider:
| Software | Key Features | Cost |
|---|---|---|
| Photoshop | Advanced editing tools | Subscription-based |
| GIMP | Free and open-source | Free |
| Canva | User-friendly templates | Free with paid options |
Closing Remarks
And there you have it! Saving your PowerPoint slides at 300 DPI for YouTube doesn’t have to feel like navigating a maze. With these easy steps, you’re not just preserving your hard work but also ensuring your presentations look fantastic on that big screen. Just think of it as giving your slides a little spa treatment—bringing out their best features while keeping them crisp and clean. So, the next time you’re prepping for that big upload, remember these tips and watch your visuals shine. After all, a stunning presentation can turn a good video into an unforgettable one! Now, go ahead and get those slides out there—you’ve got this!